To add Nuxt to an existing Vue project, first install Nuxt through npm or yarn. Then, integrate it by configuring your project to follow Nuxt’s directory structure and naming conventions.
Integrating Nuxt into an existing Vue application allows developers to leverage Nuxt’s advanced features such as server-side rendering, static site generation, and powerful routing mechanisms. Nuxt combines Vue’s powerful ecosystem with configuration-oriented architecture, making the development of universal or single-page Vue apps streamlined and efficient.
Ensuring your project structure adheres to the standards required by Nuxt is crucial, as it relies heavily on a specific file-tree for automatic routing and page creation. Starting with proper installation and meticulous restructuring paves the way for a successful integration of Nuxt, ultimately enhancing your Vue project with improved performance and SEO capabilities. Embracing this update can significantly benefit the user experience and search engine ranking, marking a strategic step in modern web development.

Credit: phrase.com
Why Use Nuxt With An Existing Vue Project
Integrating Nuxt into a Vue project elevates its potential. It enhances SEO and adds server-side rendering. This results in a more robust application.
Improving Seo
The Vue.js framework creates engaging user interfaces. Still, Vue often falls short in SEO. This is due to its client-side rendering nature. Search engines struggle to index content rendered on the client-side.
By adding Nuxt, developers improve the project’s visibility. Nuxt generates static pages. These pages are easily indexed by search engines. An existing Vue app benefits immensely.
Nuxt provides automated SEO-friendly features. Nuxt handles metadata, Open Graph tags, and JSON-LD. This makes sure that content reaches the right audience.
Adding Server-side Rendering
Server-side rendering (SSR) is crucial for performance. SSR speeds up initial page loads. It also improves responsiveness. This is essential for retaining users.
Nuxt offers out-of-the-box server-side rendering. This means Vue apps get rendered on the server. The server sends a fully-rendered page to the client. This enhances overall experience. Clients see content instantly.
SSR also aids in SEO. Pre-rendered pages mean that content is visible to crawlers without running JavaScript. This ensures every page is scannable and rankable.
Credit: www.reddit.com
Assessing The Compatibility Of Your Vue Project
Before diving into integrating Nuxt into your Vue project, a crucial step is assessing compatibility. Making the transition smoothly hinges on evaluating certain aspects of your existing application. In this phase, attention to detail guarantees a seamless upgrade to Nuxt, providing improved server-side rendering and static site generation benefits. Let’s navigate through the essentials of gearing your Vue project for Nuxt integration.
Checking The Vue Version
Nuxt requires a specific range of Vue versions to function optimally. Ensure your project runs on a compatible version. Follow these steps:
- Open your project’s package.json file.
- Locate the
"vue"dependency under"dependencies". - Compare the version number with the official Nuxt documentation.
If an update is necessary, run the command:
npm install vue@latest
Or, if you’re using Yarn:
yarn add vue@latest
This updates Vue to the latest compatible version for Nuxt.
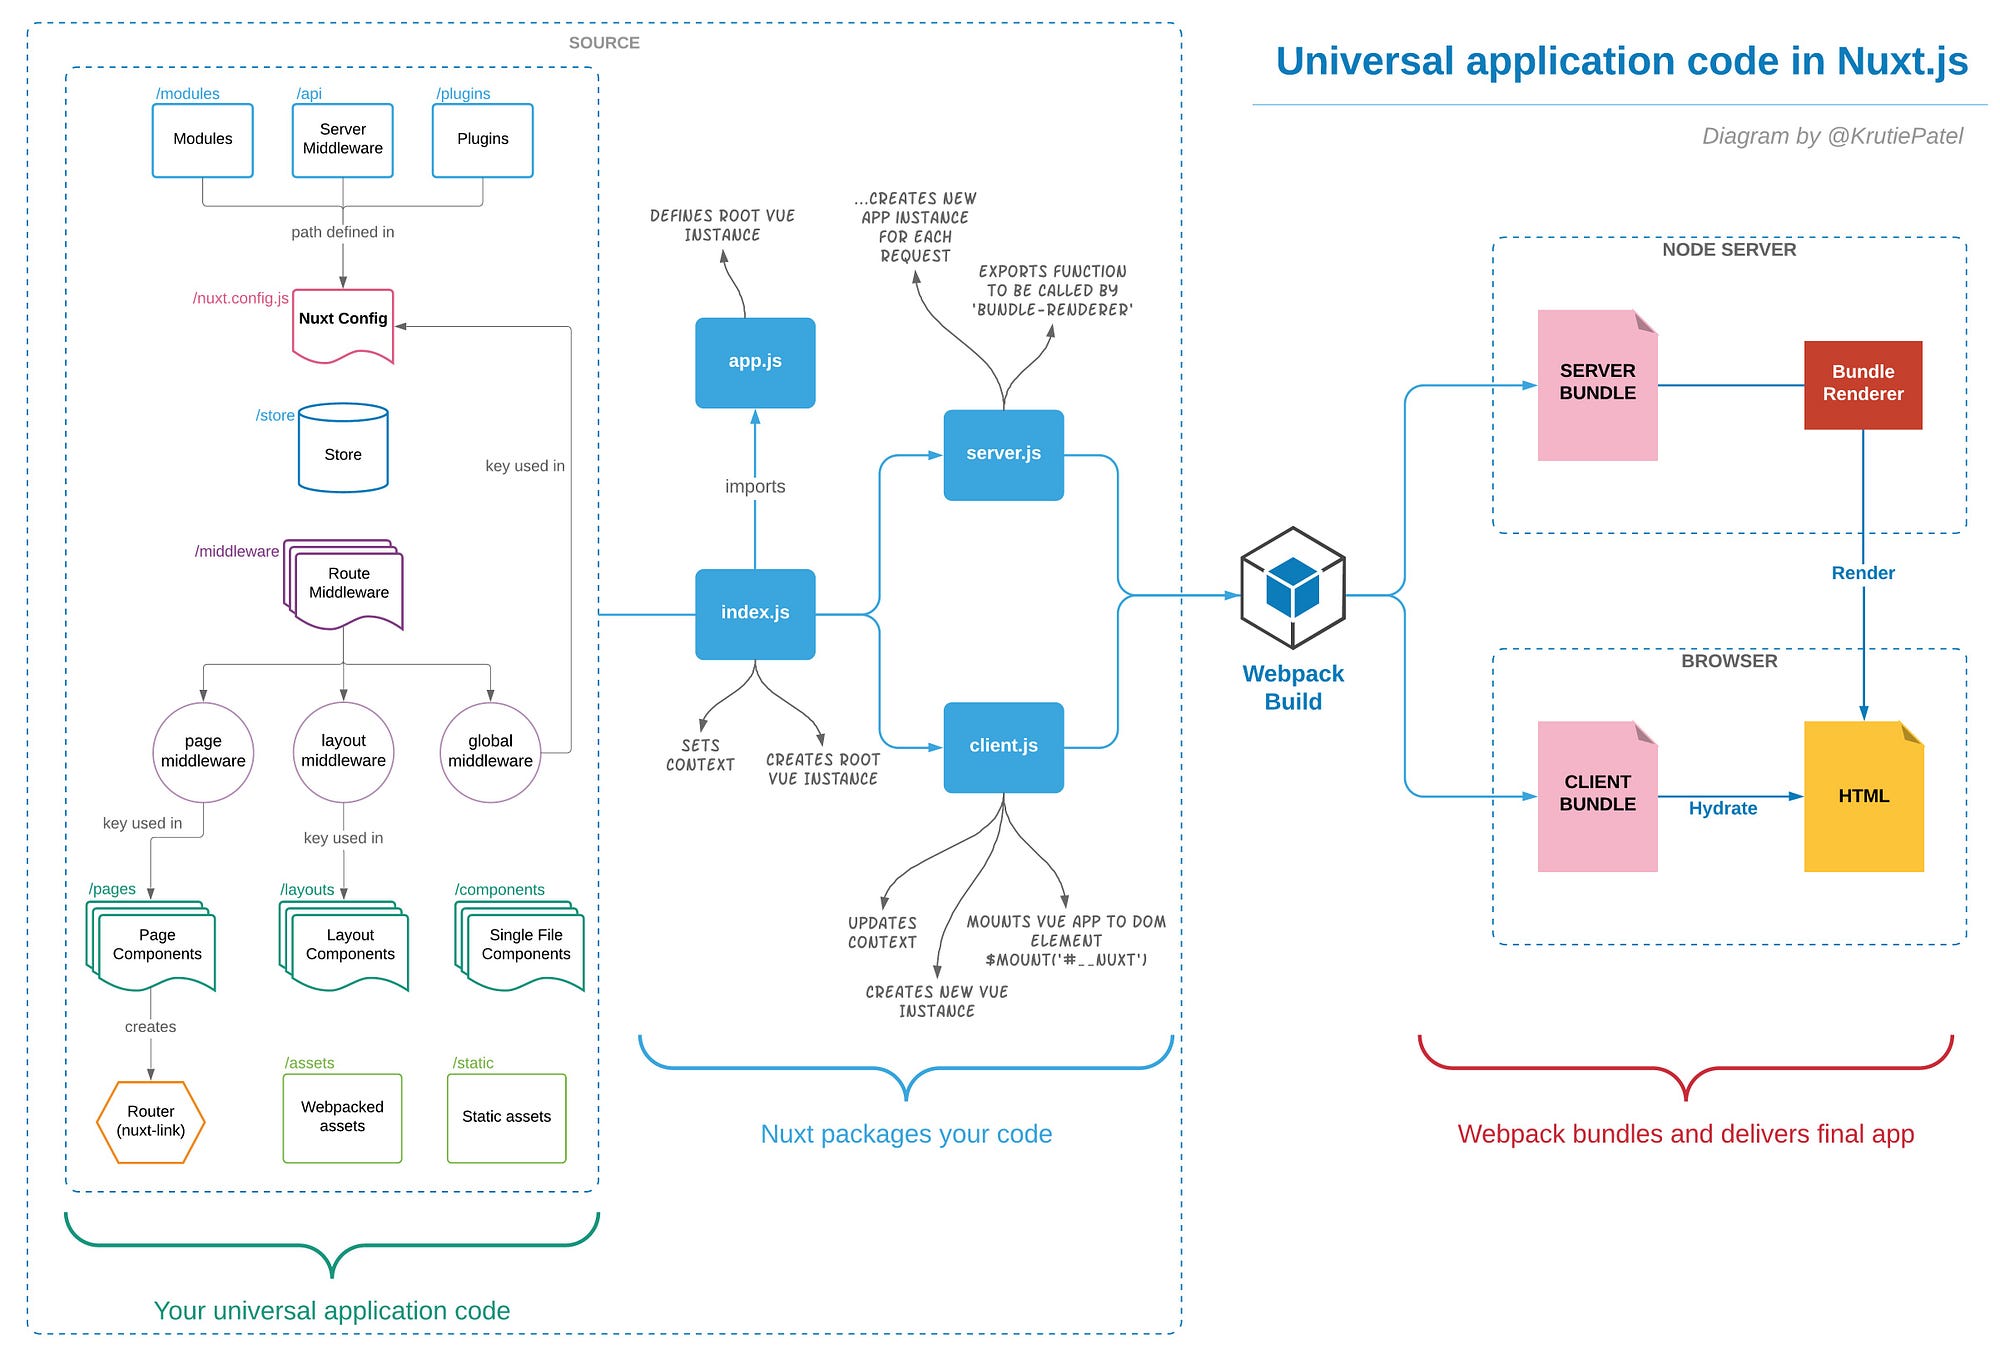
Evaluating The Project Structure
Next, assess the structure of your Vue project. Nuxt follows a convention-over-configuration philosophy. Your project must align with this structure:
- Pages directory for views.
- Components directory for reusable components.
- Store directory for Vuex store files.
If your directories differ, consider restructuring. For large projects, plan for incremental changes to reduce risks.
| Current Structure | Nuxt Structure |
|---|---|
| views/ | pages/ |
| global-components/ | components/ |
| state/ | store/ |
Streamlining your project structure not only aids in Nuxt integration but also enhances maintainability. With the Vue version confirmed and the project structure evaluated, your Vue project is now a step closer to harnessing the power of Nuxt.
Installing Nuxt And Configuring The Project
Injecting the power of Nuxt into an existing Vue.js project unlocks new possibilities. It enhances your application with server-side rendering, static site generation, and powerful modules. Begin by adding Nuxt as a dependency, and then tweak your project settings to welcome the full suite of Nuxt features into your development workflow.
Adding Nuxt As A Dependency
Start by adding Nuxt to your project’s list of dependencies. This step requires the use of a terminal or command-line interface. Navigate to your project’s root directory where your package.json file resides.
Run the following command:
npm install nuxtThis installs the latest stable version of Nuxt and updates your package.json.
Updating The Project Configuration
With Nuxt added, the next step is to reconfigure your project to align it with Nuxt’s structure. Adjust the directories and files to fit Nuxt’s expectations, which primarily involves a pages directory and a nuxt.config.js file.
- Create a
pagesdirectory in the root. - Move Vue components representing views into the
pagesdirectory. - Establish a
nuxt.config.jsfile to customize behavior.
Create your nuxt.config.js with the essential configurations:
// nuxt.config.js
export default {
  // Your custom configurations
}
Nuxt now leverages this file to tailor the application experience. Test the configuration by launching the development server:
npm run devThis command boots up your application with Nuxt enhancements. Monitor the terminal for any issues that need attention.
Credit: medium.com
Migrating Vue Components To Nuxt
Adopting Nuxt in a Vue project can streamline development. This process involves strategic adjustments to the project’s structure. It optimizes code reuse and SEO. Understanding the migration from Vue components to Nuxt is essential.
Creating Pages
Conversion to Nuxt starts with organizing Vue components into pages. Use the pages directory, a Nuxt convention, to create route-linked views. Each file in this directory becomes a route.
- Index.vue for the homepage
- About.vue for the about page
Remember to structure each Vue file with a , , and for compatibility.
Adapting Components
Next, adapt existing Vue components for Nuxt compatibility. Focus on separating global and page-specific components.
| Component Type | Description |
|---|---|
| Global Components | Register once in plugins or nuxt.config.js |
| Page-Specific | Import directly in page components |
Ensure components use asyncData or fetch methods for data fetching. Nuxt handles these server-side, aiding performance.
Update paths and imports to reflect the new directory structure. Components should now blend seamlessly into the Nuxt framework.
Testing And Building Your Nuxt Project
Testing and Building Your Nuxt Project is the final step before your application goes live. You now have Nuxt added to your Vue project. Let’s ensure everything works properly. Testing is vital. It checks if your application behaves as expected. Building is crucial. It prepares your app for the real world. Follow these steps to test and build your Nuxt project efficiently.
Running Tests
To run tests in your Nuxt project, follow this simple process:
- Install a testing library like Jest or Mocha.
- Configure it to work with Nuxt.
- Write tests for your components and pages.
- Run the tests using the
npm run testcommand.
Make sure your tests cover key functionalities. Tests must pass before building your app. A green test suite gives confidence. It says your app is ready for users.
Generating A Production Build
When ready, generate a production build:
- Ensure all tests pass.
- Update your Nuxt configuration if needed.
- Use the
npm run buildcommand. - Check the .nuxt directory. Your production-ready files are there.
This build process optimizes your app. It reduces file sizes. It increases speed. Users get the best experience. Your app shines in performance.
Frequently Asked Questions Of How To Add Nuxt To Existing Vue Project
Can You Add Vue To An Existing Project?
Yes, you can integrate Vue. js into an existing project. Simply link the Vue library in your HTML or use a module bundler like Webpack.
Can I Use Vue 3 With Nuxt?
Yes, Vue 3 is compatible with Nuxt. js through the use of Nuxt 3, which supports Vue 3 out of the box.
How Do I Create A Vue Nuxt Project?
To create a Vue Nuxt project, install Nuxt globally using `npm install -g create-nuxt-app`, then run `create-nuxt-app `. Follow prompts to customize your setup.
How Do I Use Vue Packages In Nuxt?
To use Vue packages in Nuxt, install them via npm or yarn. Add them to your `plugins` directory and reference these plugins in `nuxt. config. js`. Ensure compatible versions for seamless integration with Nuxt’s server-side rendering.
Conclusion
Integrating Nuxt into an existing Vue project can elevate your development process. Through careful implementation, your application reaps benefits in SEO, performance, and structure. Commit to this upgrade and watch your Vue app transform, harnessing the best of both worlds for a more robust web presence.
Embrace the change; your project’s future awaits.